How to Automatically Create Subtitles and Voiceovers for Videos with DHB Render
In this article, I’ll guide you step by step through setting up features, configuring APIs or AI models, and using the built-in filters in DHB Render to quickly and efficiently create, edit, and customize subtitles, translate subtitles into other languages, and add voiceovers to your videos.
- Create automatic subtitles: The software can automatically recognize and convert audio in a video into subtitles quickly and accurately.
- Translate subtitles: Supports translating subtitles into multiple languages, helping your video content reach a wider international audience.
- Automatic voiceover: Converts subtitles into speech with voice options from various services such as OpenAI, FPT.AI, Viettel.AI, TTSFree, and Zalo.
- Remove vocals (Vocal Remover): This feature lets you separate vocals from the background music, making it easier to add voiceovers or change vocals.
1. Install an API or Download an AI Model
First, to use the Auto Subtitle, Translate, Speech, and VocalRemover filters, you need to install an API to connect to a third party, such as OpenAI, for Cloud processing (paid), or Download an AI model to run locally on your machine (free, but requires a powerful CPU and GPU for processing).
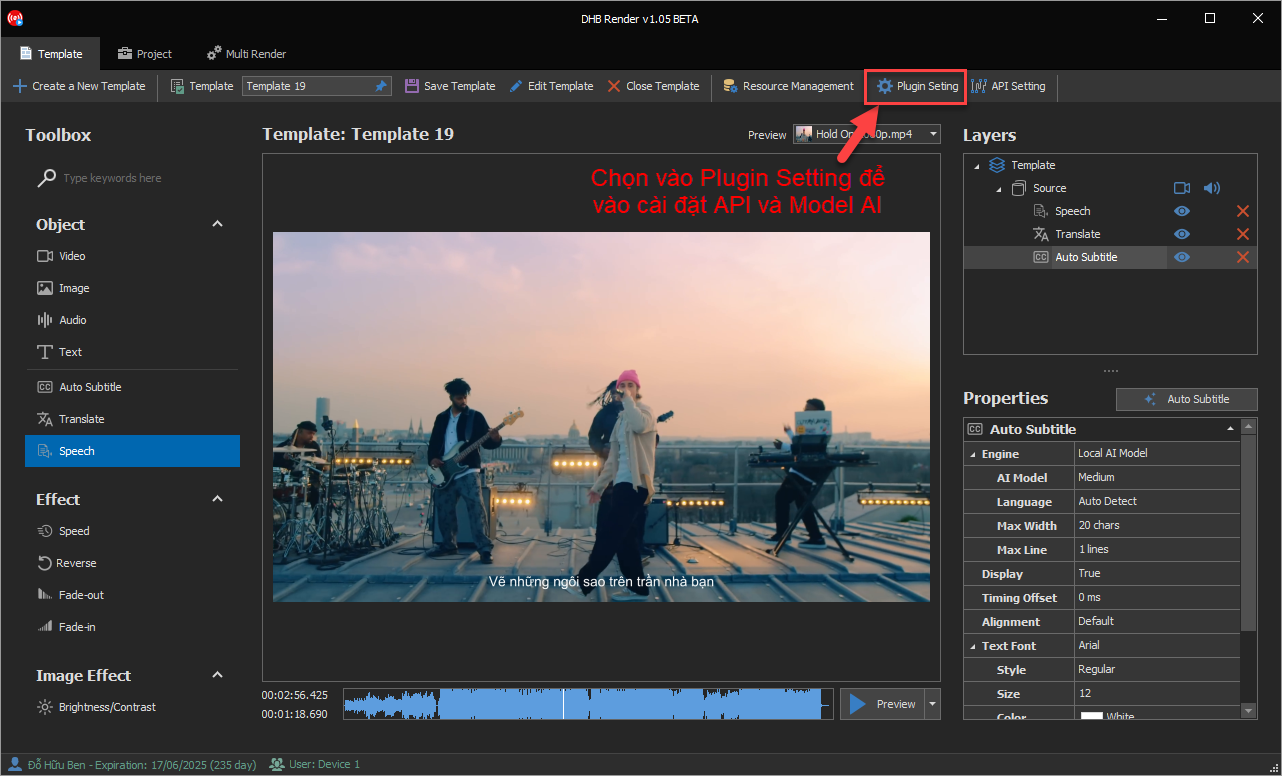
Select Plugin Setting in the Template tab to open the API or AI Model settings.
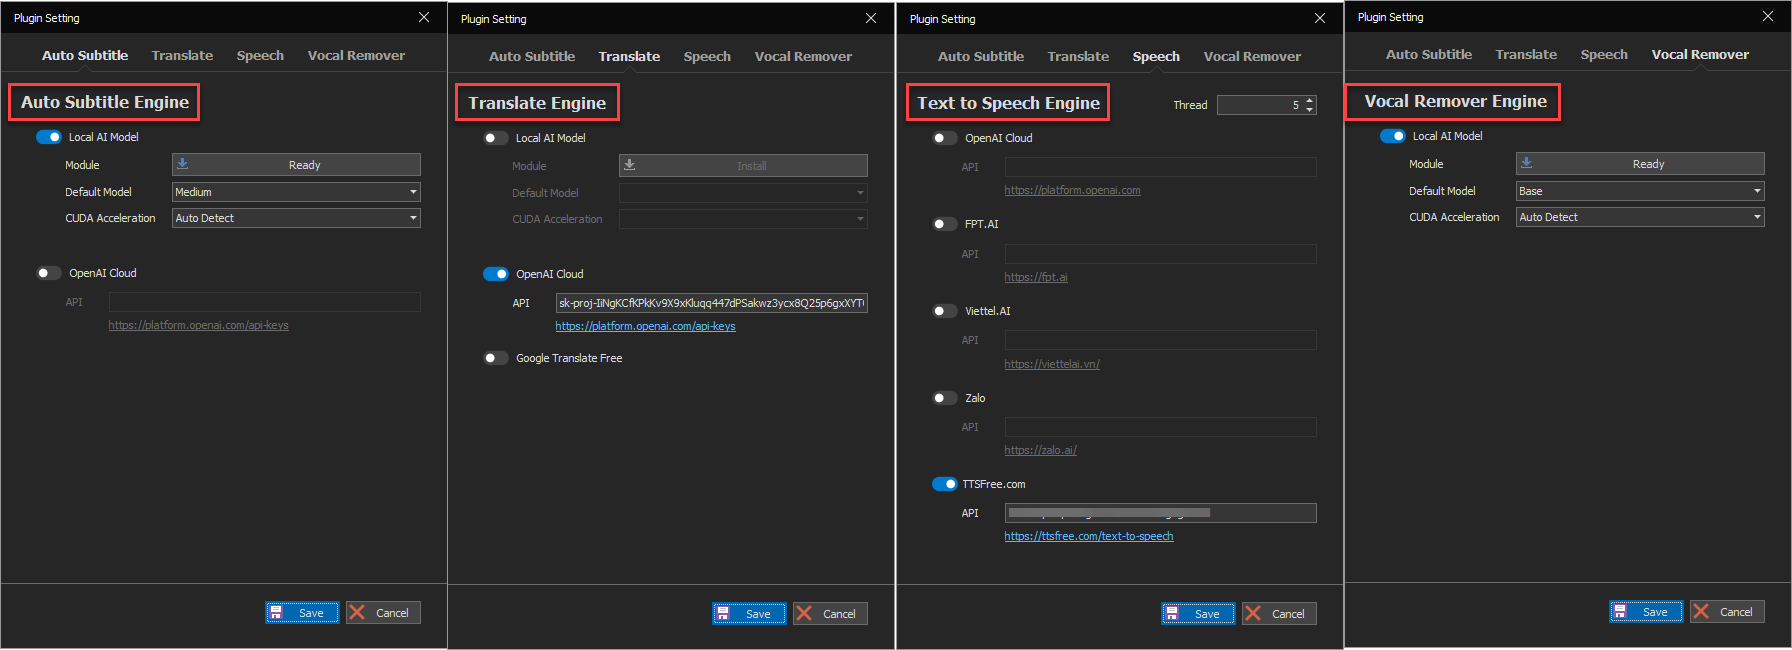
You need to fully configure the API or AI Model for each feature. For features that support an AI Model, turn them on and then click Install so the software can start installing. After installation succeeds, the software will display Ready and allow you to choose a Model, as well as whether to use GPU or not. (Only Nvidia GPUs are supported; AMD is not supported).
When using any Local Model AI option, you should choose Auto with CUDA Acceleration to speed up processing. The speed is very, very much faster than CPU. If you do not have a GPU, you should not use the Local Model AI option because CPU processing will take extremely long.
- Auto Subtitle: If your machine has an Nvidia GPU, you should use the Local AI Model. Otherwise, you should only use OpenAI Cloud but the accuracy will not match the Model options Medium and Large of Local AI Model. The higher the model, the more accurate the recognition, but the heavier it is.
- Tiny: Size 40MB. Requires GPU with VRAM above 1GB. Recognition speed x10
- Base: Size 74MB. Requires GPU with VRAM above 1GB. Recognition speed x7
- Small: Size 244MB. Requires GPU with VRAM above 2GB. Recognition speed x4
- Medium: Size 769MB. Requires GPU with VRAM above 5GB. Recognition speed x2
- Large: Size 1.5GB. Requires GPU with VRAM above 10GB. Recognition speed x1
- Translate: You should use the OpenAI Cloud option because ChatGPT AI models can edit and understand context to translate subtitles with near-perfect accuracy, but this is paid. Alternatively, you can use the Local Model AI option, which is free but consumes machine resources. It has 2 options: Fast and Accurate, with relatively good performance.
- Speech: There is a Thread option, which is the number of audio generation threads running at the same time. This applies to all voice generation services from OpenAI, FPT, Zalo, Viettel, and others.
- VocalRemover: If you want to remove vocals or specific audio from a video, use this filter.
2. Drag the filters into the video and use them
Auto Subtitle: This filter helps you automatically create subtitles from the video’s audio.
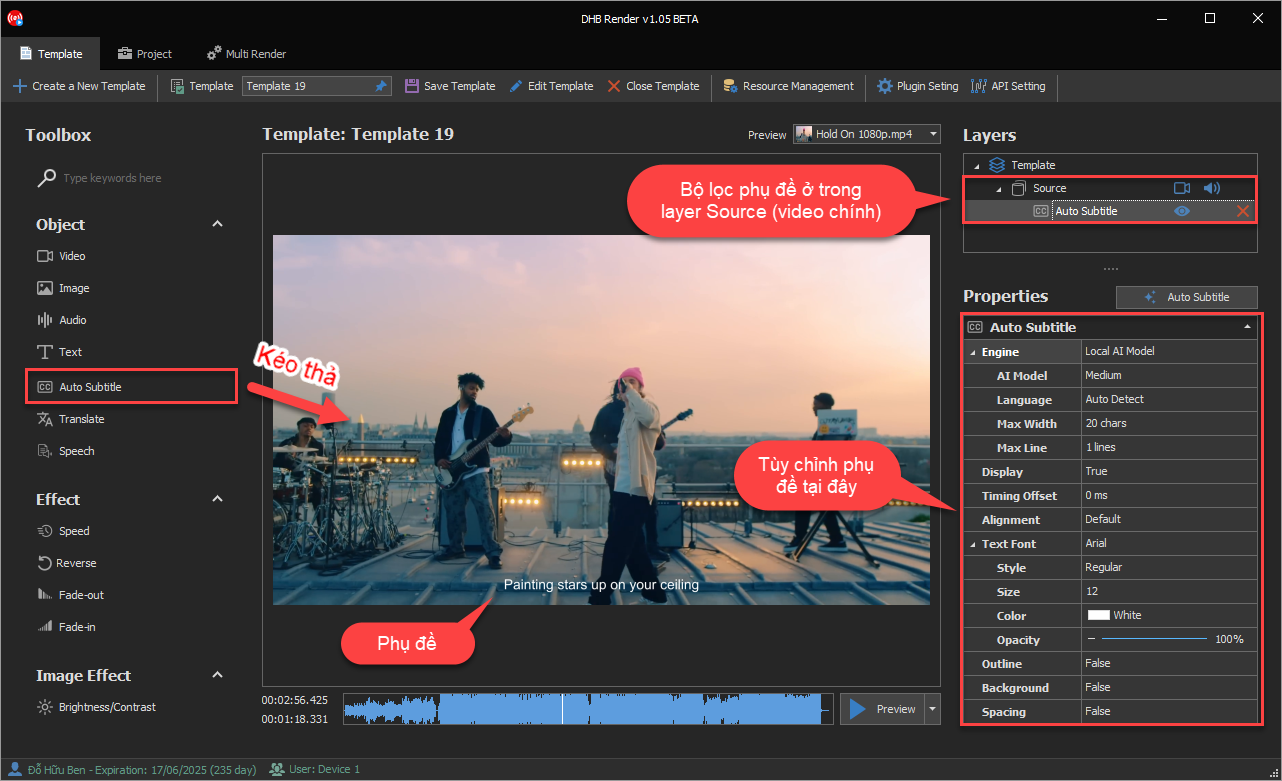
Simply drag the Auto Subtitle filter into the video. The settings include:
- Engine: Choose between Local AI or OpenAI.
- AI Model: Adjust the detail level of the AI model (for example: Medium).
- Language: Automatically detect the language or select a specific language.
- Max Width: Sets the maximum subtitle length by the number of characters per line. This helps you control subtitle width so it fits the frame.
- Max Line: The maximum number of lines displayed for each subtitle. This option helps prevent subtitles from becoming too long and hard to follow.
- Display: Lets you turn subtitle display on or off. When turned off, subtitles will not appear on the video.
- Timing Offset: Adjusts subtitle display timing to sync or delay subtitles as needed (measured in milliseconds).
- Alignment: Subtitle position alignment options on the screen, including center, left, right, or other positions.
- Text Font: Subtitle Font
- Font: Choose the font for subtitles (for example: Arial).
- Style: Choose the text style (Regular, Bold, Italic) to emphasize subtitles.
- Size: The subtitle size, helping you adjust it to fit the frame and make it easy to read.
- Color: Subtitle color options, allowing you to create contrast and make text stand out on the video.
- Opacity: Adjust subtitle opacity (0% to 100%), helping subtitles blend with the video or stand out more.
- Outline: Adds an outline to subtitles to make the text clearer, especially useful when the video background has a similar color to the subtitles.
- Background: Adds a background behind subtitles to increase contrast and make them easier to read in complex scenes.
- Spacing: Customizes the spacing between letters in subtitles, improving aesthetics and readability.
Translate: This feature helps you translate subtitles into another language.
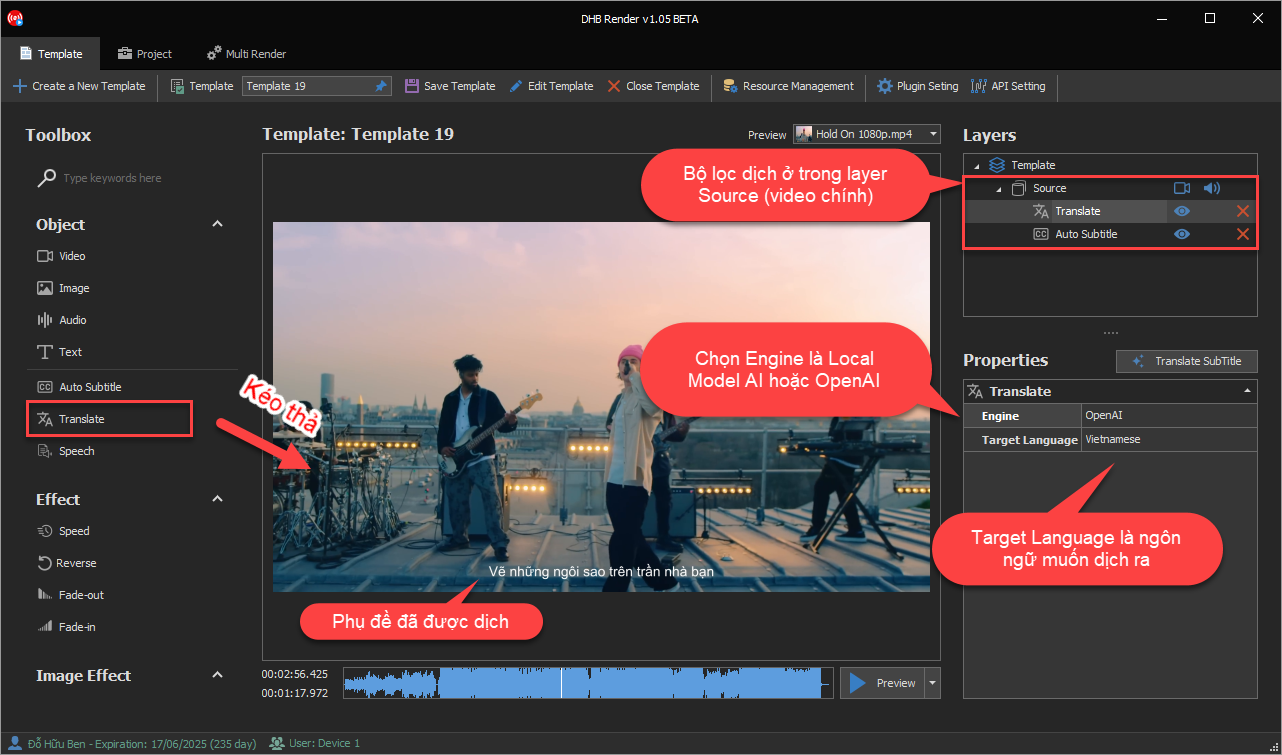
- Engine: Choose the appropriate translation model.
- OpenAI: Translates subtitles through OpenAI servers. An API Key is required. With context understanding, translations can be almost perfectly accurate.
- Google Translate: Free automatic translation from Google
- Local Model AI: Powerful AI translation installed locally on your computer and free to use, but it consumes machine resources.
Speech: Creates an automatic narration voice for your video.
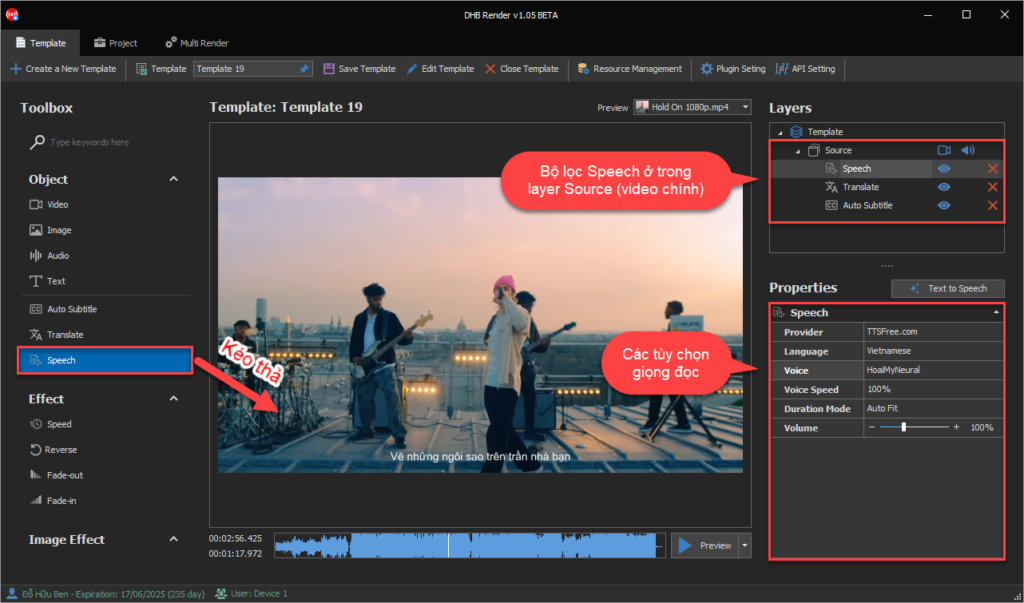
The Speech feature in DHB Render lets you convert subtitles or text into automatic speech, giving your videos professional and natural voiceovers. The options in Speech include:
- Provider: Choose the Text-to-Speech (TTS) service provider. Popular providers include:
- TTSFree.com: Provides low-cost TTS service with many different voices.
- In addition, you can choose other services (if installed), such as OpenAI Cloud, FPT.AI, Viettel.AI, or Zalo.
- Language: Choose the language for the voice. For example: Vietnamese, English, or any other language supported by the provider.
- Voice: Select a specific voice from the available list. For example, the HoaiMyNeural voice provides natural and pleasant audio, suitable for Vietnamese videos.
- Voice Speed: Adjust the voice speed from 0% to 200%, with 100% as the default speed. You can increase the speed to save time or reduce it for better clarity.
- Duration Mode: Choose how to adjust the voice length so it matches the video:
- Auto Fit: Automatically adjusts the voice to match the video timing, ensuring the voiceover always stays in sync and accurate.
- Auto Trim: Automatically trims excess voice audio if the spoken sentence is longer than the subtitle segment.
- Volume: Adjust the voice volume from 0% to 300%. This setting helps you easily balance voice volume against other audio elements in the video.
Vocal Remover - Professional Vocal Removal

The Vocal Remover filter in DHB Render lets you separate vocals from the background music in a video, making it easier to add a new voiceover, create karaoke, or produce professional instrumental tracks. Below are the options you can configure in Vocal Remover:
- Vocal Volume: Adjusts the volume of the vocals after they have been separated. You can:
- Reduce it to 0% to completely remove vocals from the track, suitable when you need to create instrumental tracks.
- Increase or decrease the volume as desired to control how present the vocals are in the video.
- Music Volume: Adjusts the volume of the background music (the remaining audio after separating vocals). This setting allows you to:
- Keep the background music volume at 100% or lower it if you want the vocals to stand out more.
- Increase the background music volume to cover unwanted noise or create a stronger audio effect.
3. Customize and preview the Auto Subtitle, Translate, and Speech filters
After setting up the Auto Subtitle, Translate, and Speech filters, you can customize them further with the following steps.
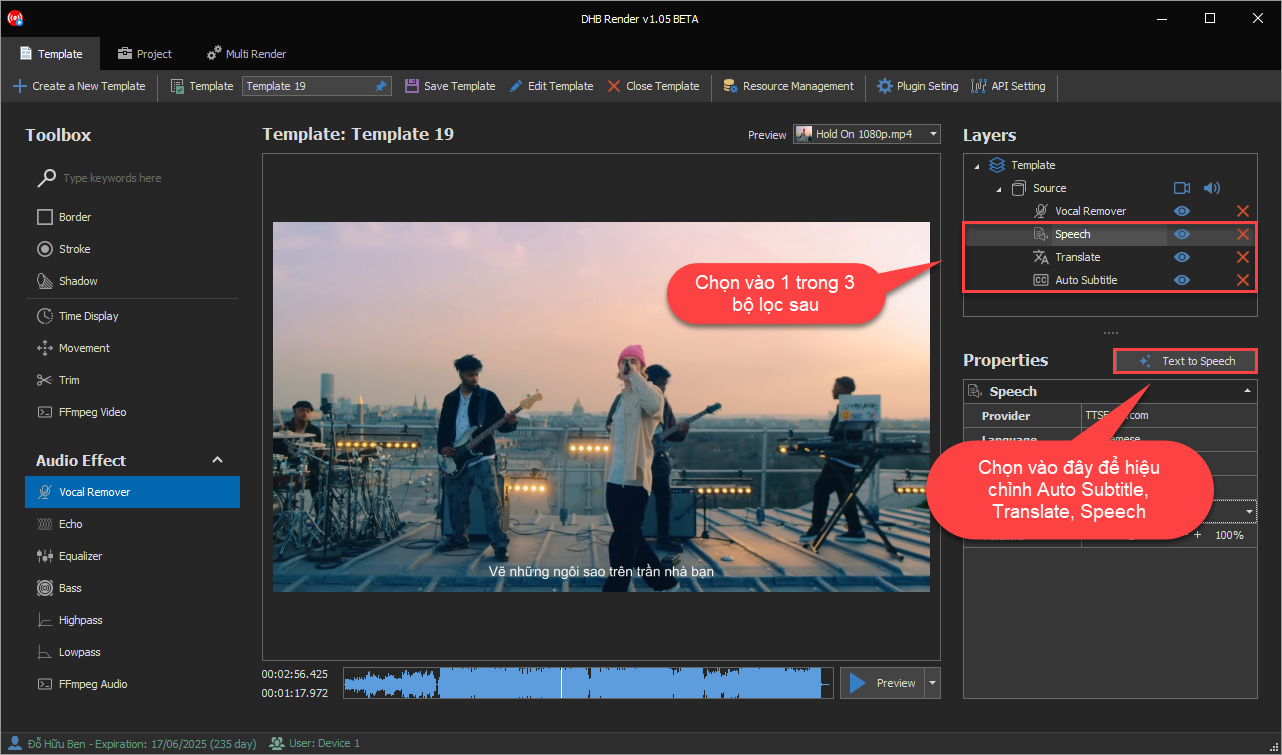
Select any Auto Subtitle, Translate, or Speech filter, then click the button next to Properties as shown in the image to edit it.
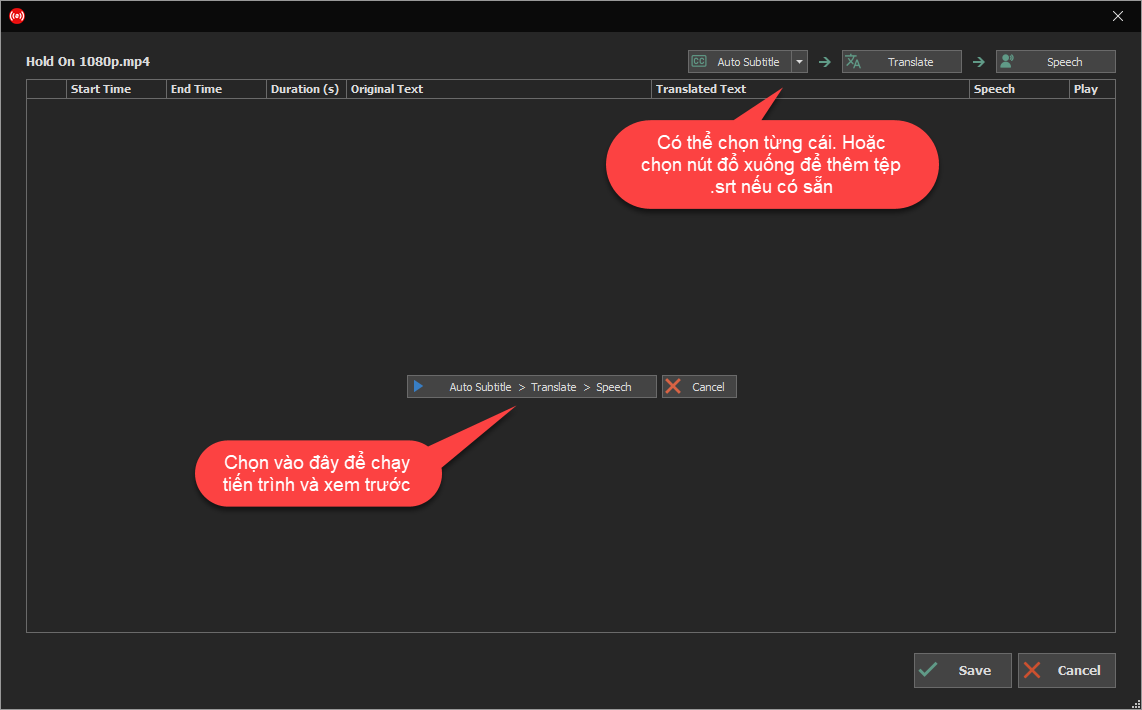
Click the start button in the middle of the screen as shown in the image to begin processing.
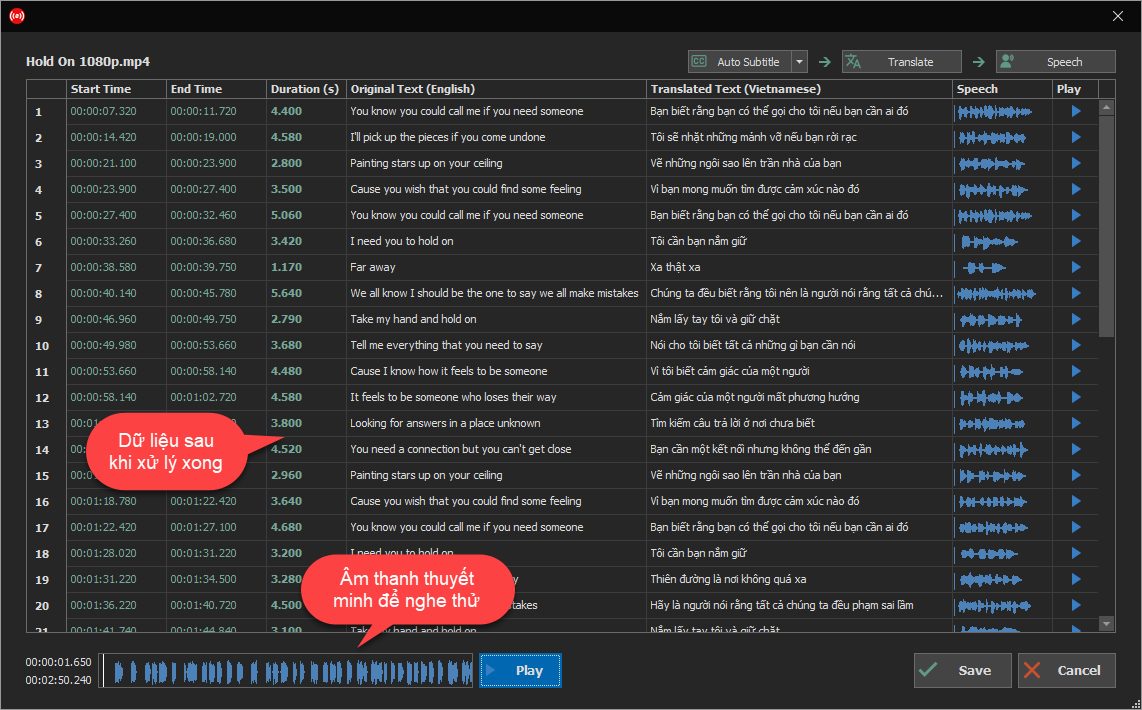
After processing is complete, click the Save button to save it.
4. Preview and save the Template for batch rendering multiple videos
Here is the result. Save the Template, then you can run this Template with a large batch of videos. The software will automatically create subtitles, translate them, and read them using the voice you configured in the Template for all videos. You can review the previous guide to perform batch video rendering.
If you have any questions, please contact us via Website & Fanpage:
Bình luận
Chưa có bình luận nào. Hãy là người đầu tiên!

Hướng dẫn sử dụng chức năng Resource trong DHB Render
Resource là chức năng giúp bạn có thể lấy ngẫu nhiên nguồn cho video, ảnh, âm thanh cho các phần tử trong bản mẫu Khi thêm các phẩn tử video, ảnh, âm thanh nếu thêm từ File thì khi sử dụng bản
Read more →
Hướng dẫn kết nối DHB Upload với DHB Render
Kết nối API giữa phần mềm DHB Upload với DHB Render giúp người dùng DHB Upload có thể dễ dàng sử dụng các bản mẫu (Template) kết xuất video của DHB Render ngay trong các phần mềm DHB Upload. 1. Lấy Toke
Read more →
Hướng dẫn sử dụng phần mềm DHB Render
DHB Render là giải pháp mạnh mẽ giúp bạn tạo ra các bản mẫu video (template) và kết xuất hàng loạt video một cách nhanh chóng. Với giao diện trực quan và các tính năng đa dạng, DHB Render hỗ trợ bạn
Read more →
Hướng dẫn sử dụng Render ClaimID phần mềm Upload Youtube
Để sử dụng được chức năng này tài khoản của các bạn phải là tài khoản Pro.Sau đây là các bước cài đặt Render và chạy. Sau khi giao diện kết xuất được mở. Chọn Render ClaimID. Bạn có thể thê
Read more →