How to Use DHB Render Software
DHB Render is a powerful solution that helps you create video templates and render videos in bulk quickly. With an intuitive interface and a wide range of features, DHB Render supports you from template design to final video export, saving time and effort.
Key features:
- Create flexible templates:
- Customize layouts with multiple layout modes.
- Randomly add Intros and Outros to make videos more dynamic.
- Supports multiple output video sizes and formats (MP4, MKV...).
- Leverage Nvidia GPU power for faster video export.
- Intuitive, easy-to-use interface:
- Easily insert images, videos, audio, and text.
- Supports drag-and-drop layers to edit position and order.
- Trim, rotate, and add effects to video and audio.
- Preview templates before exporting.
- Bulk rendering:
- Manage and render multiple projects at the same time.
- Add videos from multiple sources: File, Folder, Youtube.
- Trim and split videos into multiple parts.
- Customize output file names.
- Multi-threaded rendering to speed up processing.
- Publish templates via Tool Upload:
- Compatible with DHB Tools Upload tools, helping you easily use templates in other tools for further editing and video publishing.
Usage workflow diagram:
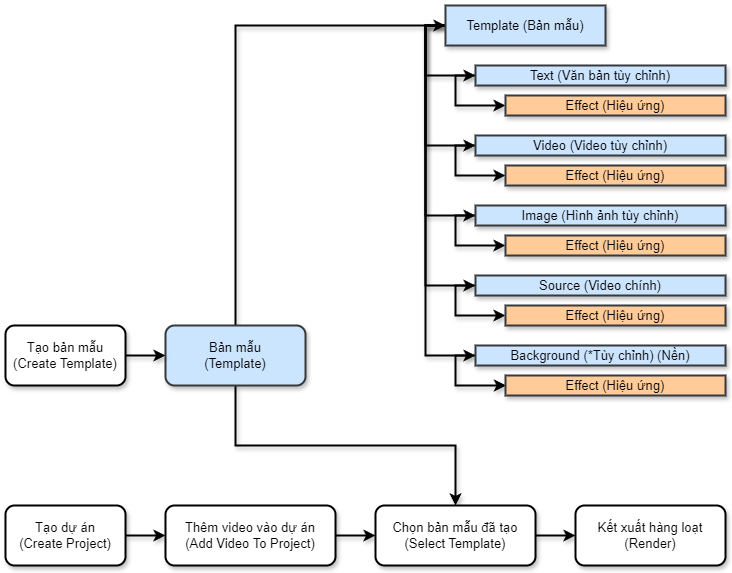
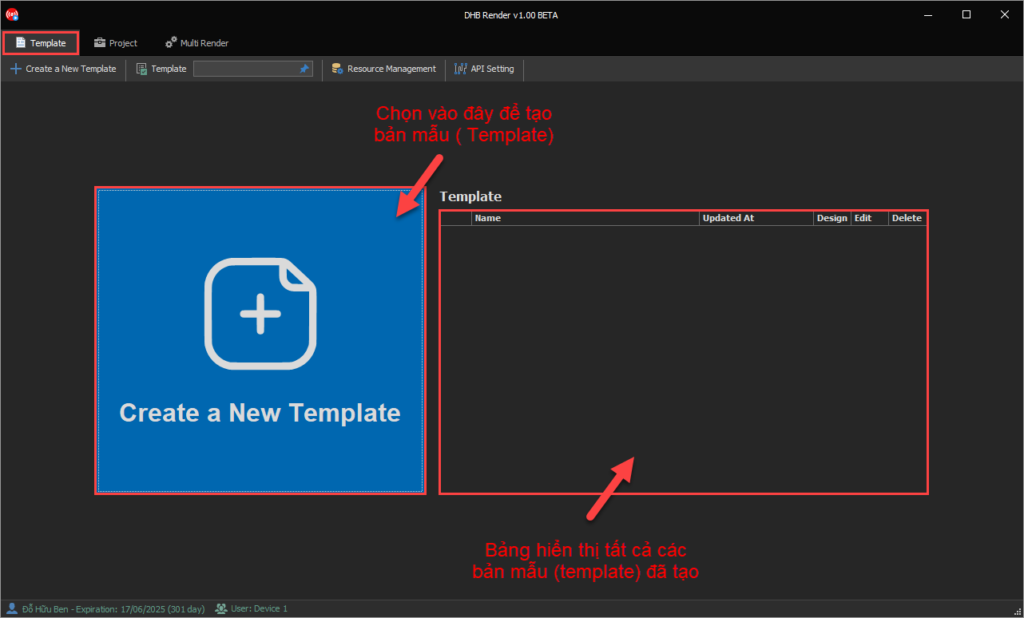
1. Create a Template
On the main interface, select 'Create a New Template' to create a new template.
The template creation window will appear. You need to enter the following parameters to create the template.
In the Project tab
- Project Name: Template name
- Decoder: Video decoder (It is recommended to keep the default as Software-based Decoding)
- Encoder: Video encoder (If your computer has a graphics card, also known as an Nvidia GPU, choose Nvidia Hardware Acceleration. Rendering speed can be several times faster than the Software-based Decoding option.)
- Extension: The output video format (The most common choices are MP4 (MPEG-4) or MKV (Matroska))
- Video Codec: The image compression type for the output video (Choose H264 AVC or H265 NEVC, as these are the two most common compression types)
- Framerate: The frames-per-second rate of the output video (The Match Source option will use the input video's frame rate)
- Bitrate Video: The video's bitrate. The higher it is, the sharper the video, but it also increases the output video file size (The Dynamic CRF option automatically adjusts the video's bitrate based on the original video to optimize output quality and file size)
- Audio Codec: The audio compression type for the output video (AAC is recommended because it is the most common compression type)
- Bitrate Audio: Similar to Bitrate Video, but for audio
- Preset: Preconfigured settings. (The Medium option provides the best balance between quality and rendering speed)

In the Layout tab
Output Size Type: the output video size type. There are 4 options
- Keep original size: Keep the original input video size. After rendering, the video will have the same size as the source video
- Scale size: Resize the input video. After rendering, the video will follow the configured size. If the source video does not have the same aspect ratio as the configured output size, the video will be distorted.
- Crop to center: Resize by cropping into the center of the video. After rendering, the video will follow the configured size. If the source video does not have the same aspect ratio as the configured output size, the software will automatically crop off the excess edges
- Add video background: Add a background layer behind the input video. The background can be an image, color, video, or the source video itself placed behind the source video
In the Other tab
There are options to add an Intro and Outro to the template
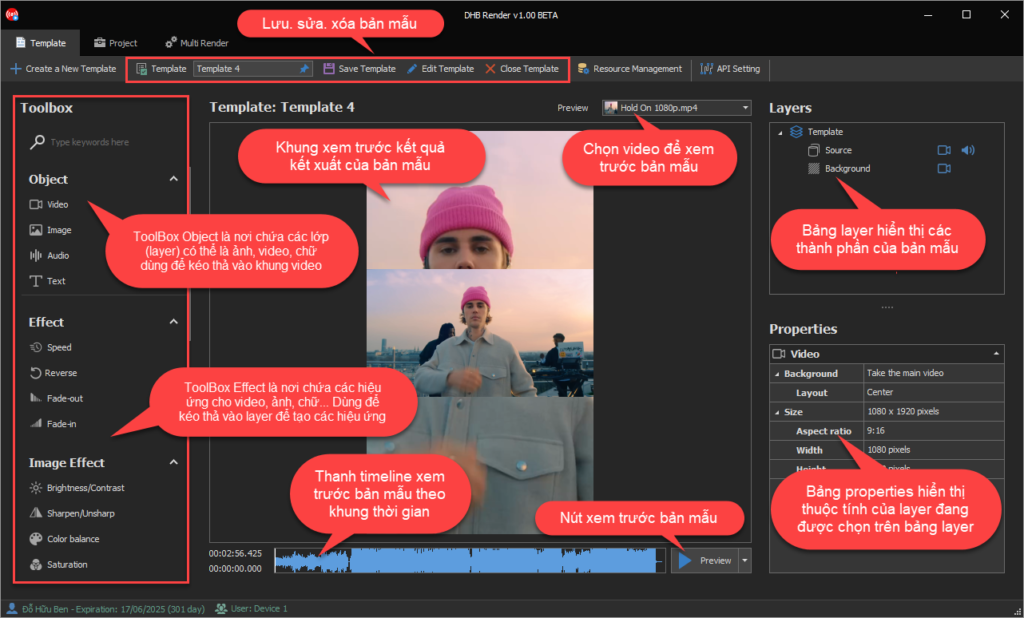
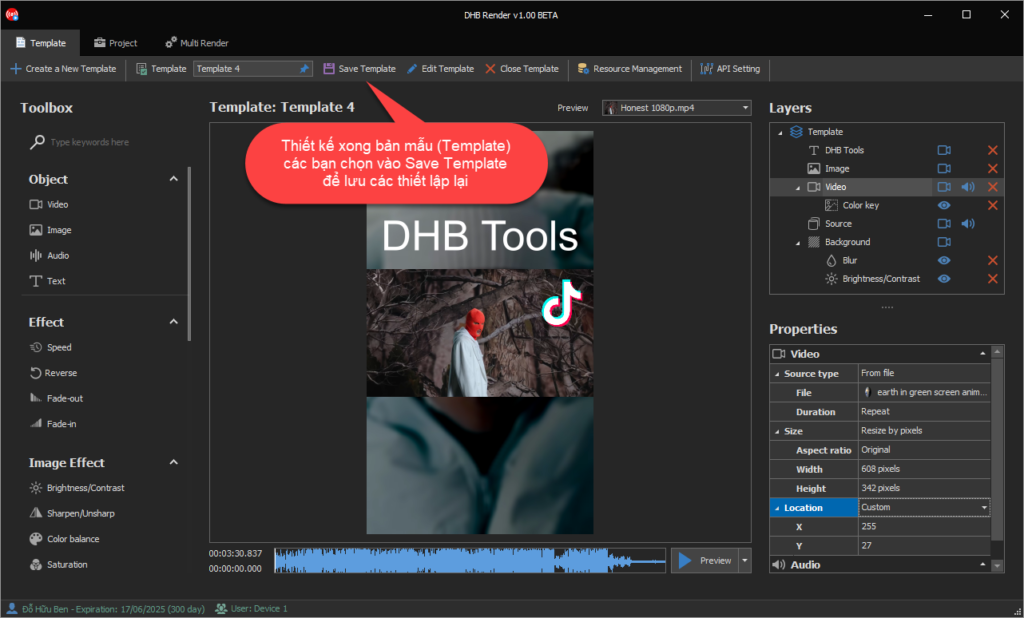
After configuring the template parameters, click the 'Create' button to enter the template design interface. Please see the image below to better understand the template design tools
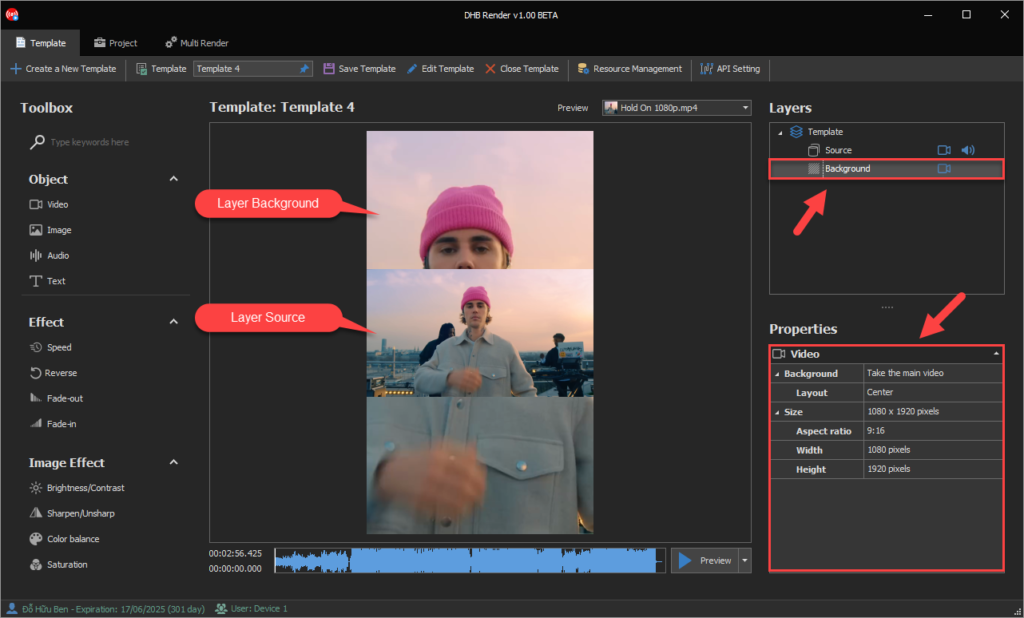
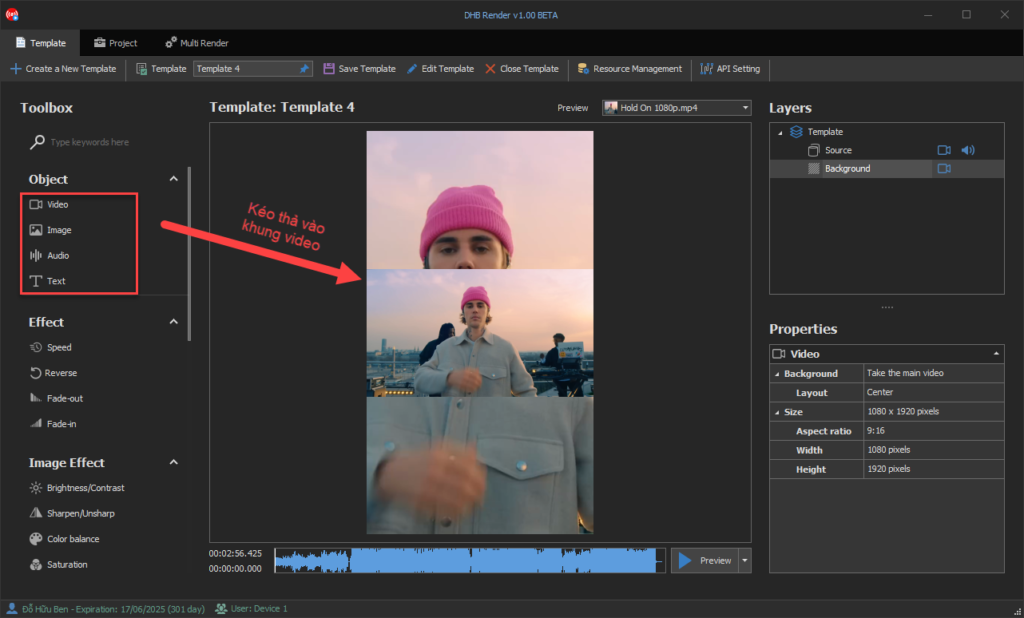
Because when creating the template, I selected Output Size Type as 'Add video background' and Ratio Output as '9:16' so you can see that in the Layers panel, there are 2 layers: Background and Source.
The Source layer is above the Background, and the Background size is 1080 x 1920 pixels. To edit the video size and ratio, select the Background layer in the Layers panel, then adjust the parameters in the Properties
Next, I will show an example of adding 1 video and 1 image to the template. Drag the Video Object from the ToolBox panel into the center of the main video
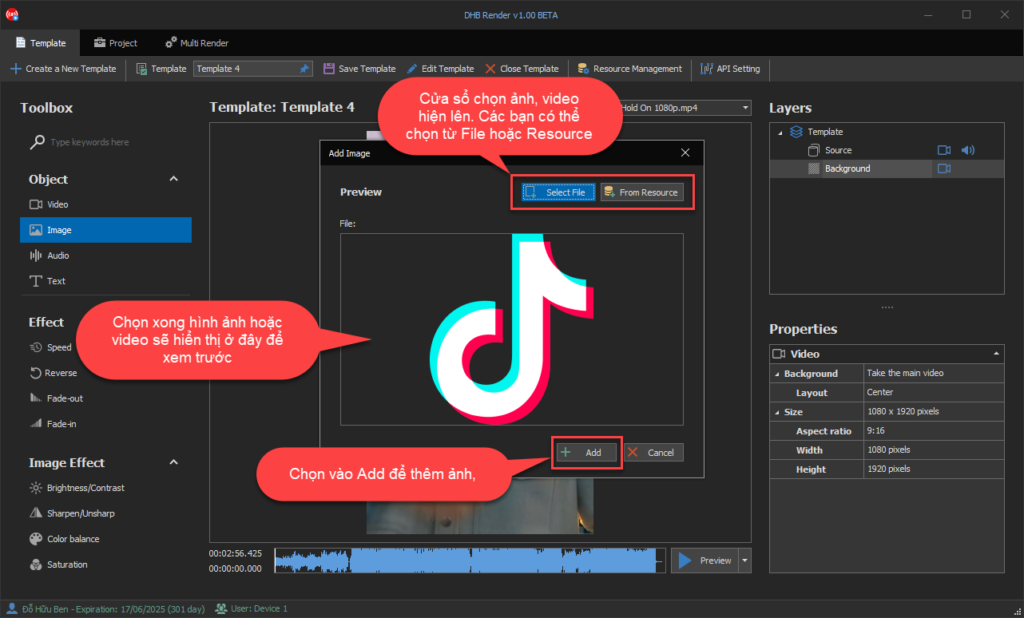
Drag and drop elements (Objects) such as Video, Image, Text ... into the preview frame or Layer panel. The image/video selection window will appear. You can import from a file (Select File) or from the resource list (Resource). After selecting, click Add to add it to the Template
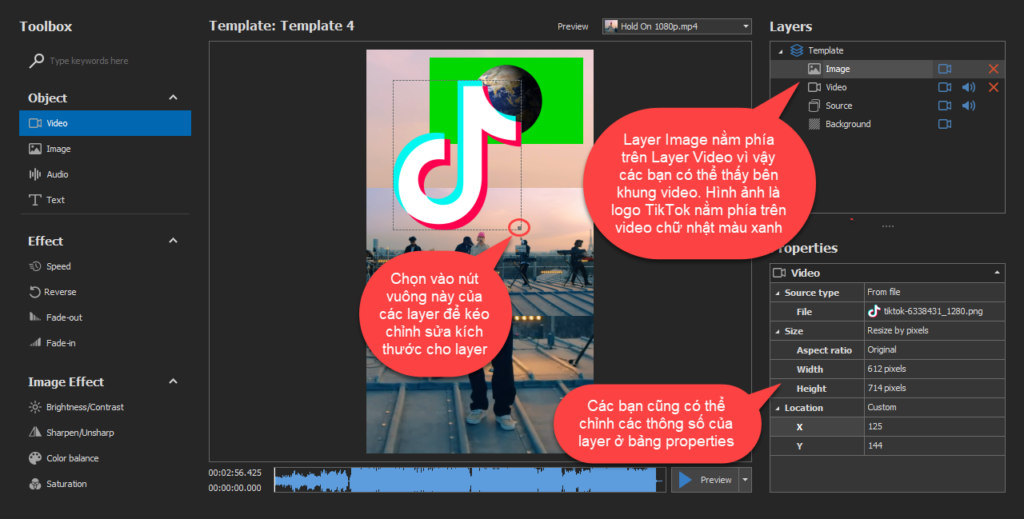
Once added successfully, the element you just added will appear in the Layers panel. The item positioned higher will be displayed on top. You can drag and drop items up or down to change their position
To resize, select the element, then select the square handle at the bottom-right corner of that element and drag to resize it. You can also change the element's display ratio and size in the Properties panel
Drag and drop the element to move it, or edit the Location property in the Properties panel
Now I will show an example of adding a background removal effect to the green-screen video I added earlier. Drag and drop the Color Key filter from the ToolBox panel onto the video you want to remove in the preview panel, or onto the Video Layer in the Layers panel. The Properties panel contains the settings you need to adjust to remove the background color. The same applies to other filters in the ToolBox panel. Each filter has its own function
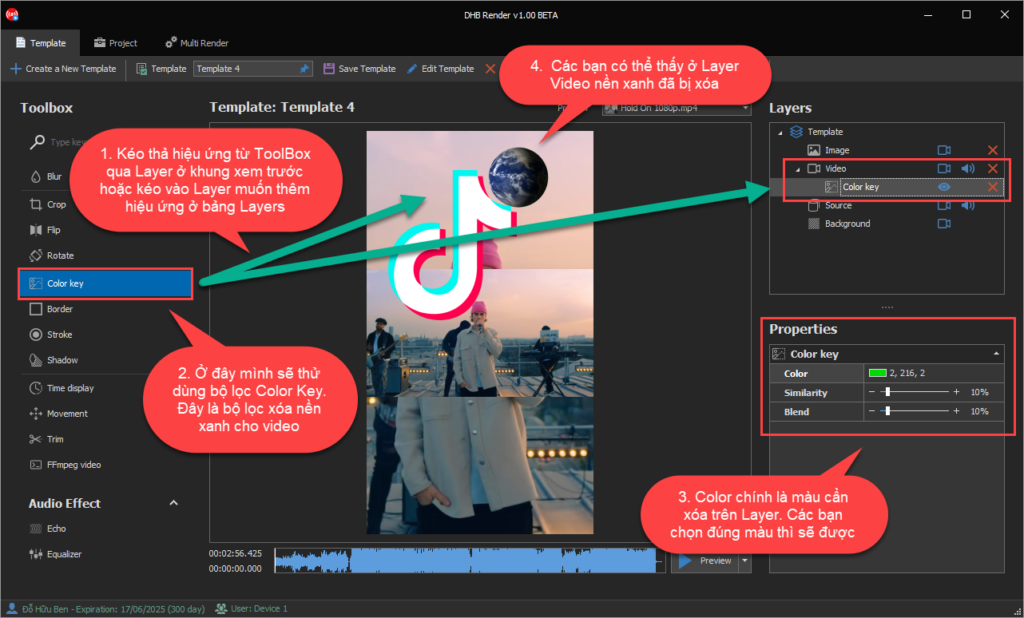
You can click the Preview button to preview the result
Select Save Template to save the settings
2. Create a Project
Select the Project tab to switch to the project creation interface
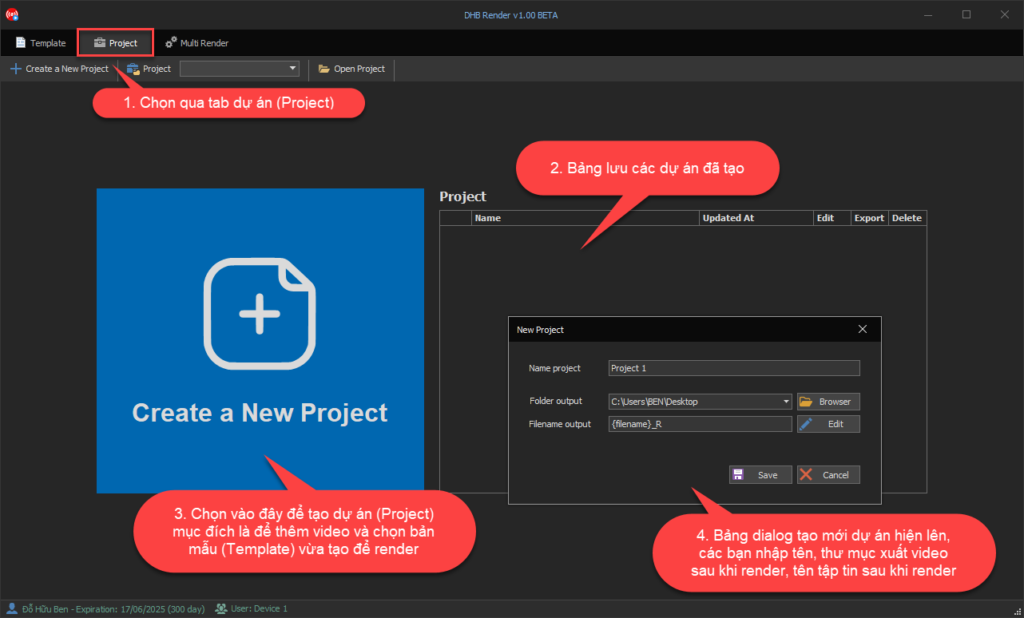
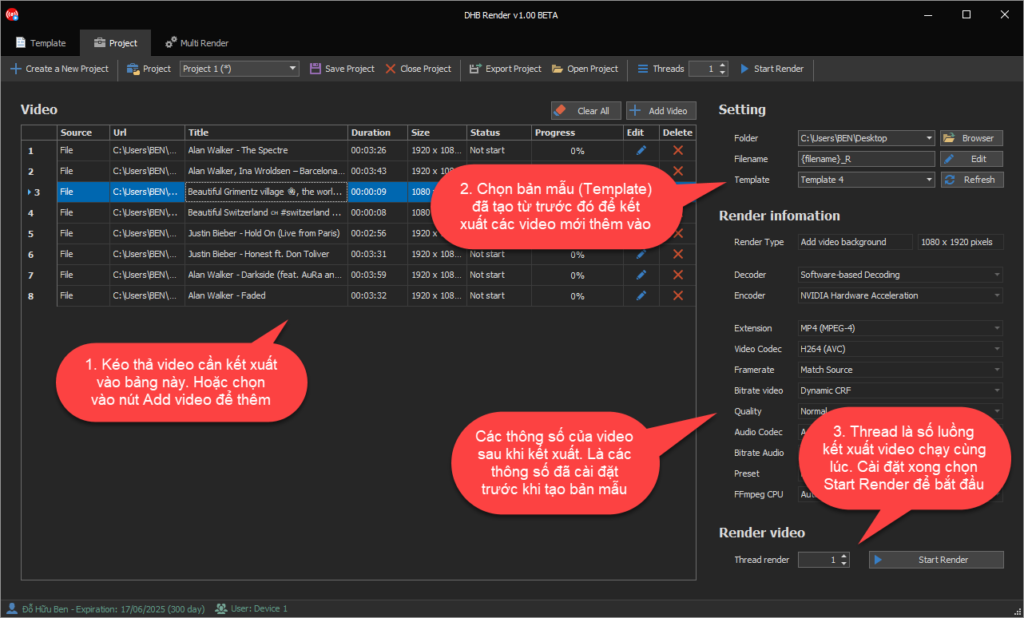
Drag and drop videos into the Video panel, or click the Add Video button to add videos
Select the Template you want to use, along with options such as output folder and output file name
Set the thread count (the number of rendering threads running simultaneously), then click Start Render to begin rendering the video
After rendering, the video will appear in the folder you configured.
Wishing you success !
Basic usage tutorial video
https://www.youtube.com/watch?v=SDaUTneAUgM
If you need support or have any questions, please contact me via Fanpage https://facebook.com/dhbtools nhé.
Bình luận
Chưa có bình luận nào. Hãy là người đầu tiên!
Hướng dẫn tạo phụ đề, thuyết minh tự động cho Video bằng DHB Render
Trong bài viết này mình sẽ hướng dẫn bạn từng bước để thiết lập các tính năng, cài đặt API hoặc model AI, và sử dụng các bộ lọc có sẵn trong DHB Render để tạo, chỉnh sửa và tùy chỉnh phụ đề, dịch phụ
Read more →
Hướng dẫn sử dụng chức năng Resource trong DHB Render
Resource là chức năng giúp bạn có thể lấy ngẫu nhiên nguồn cho video, ảnh, âm thanh cho các phần tử trong bản mẫu Khi thêm các phẩn tử video, ảnh, âm thanh nếu thêm từ File thì khi sử dụng bản
Read more →
Hướng dẫn kết nối DHB Upload với DHB Render
Kết nối API giữa phần mềm DHB Upload với DHB Render giúp người dùng DHB Upload có thể dễ dàng sử dụng các bản mẫu (Template) kết xuất video của DHB Render ngay trong các phần mềm DHB Upload. 1. Lấy Toke
Read more →
Hướng dẫn sử dụng Render ClaimID phần mềm Upload Youtube
Để sử dụng được chức năng này tài khoản của các bạn phải là tài khoản Pro.Sau đây là các bước cài đặt Render và chạy. Sau khi giao diện kết xuất được mở. Chọn Render ClaimID. Bạn có thể thê
Read more →