Broadcast a video, a folder, a playlist or a link to YouTube, Facebook and any RTMP server. Keep streams running 24/7 on a VPS, schedule when they start, manage many streams at once and watch them all from one place on the web. Build your output with a drag-and-drop editor — arrange video, images, text, music and effects without leaving the app.
Các gói đều có đầy đủ tính năng, chỉ khác nhau về thời hạn sử dụng.
1 month
250.000₫
250.000₫ per month
3 months
600.000₫
200.000₫ per monthSave 20%
Most popular
Lifetime
1.200.000₫
vs. 2 years of monthly billingSave 80%
Livestream in just a few steps
Step 1/4Drag in a video, folder or playlist, or paste a link into the Input field.
DHB Stream Pro
YouTubeWaiting
Waiting
Live
Phim hành động 24/7
Your channel128 watchingSubscribe
TikTokWaiting
Waiting
Your channel128 viewersFollow
LIVE
minhanhHi everyone
thu.haGreat movie
bao99Followed
Add comment…
Pick your source: Choose what to broadcast — a video, a folder, a playlist, a live link, or a screen recording
Livestream from a single video or an entire folder
Supports YouTube links, direct links and yt-dlp sources
Import a list of videos and URLs from a text file
Record the full screen, a window, or a region you choose
Restream a livestream that is already running
Shape the content: Design how the video looks using drag-and-drop or FFmpeg, and stack extra layers and effects
Drag and drop video, images, text and background music
Crop, rotate, blur, brighten and change speed
Preview the rendered result
Write your own FFmpeg commands
Set up the stream: Choose where to broadcast, set the schedule and loop mode, and configure each stream before it goes live
Broadcast to YouTube, Facebook and RTMP servers
Give each stream its own start time
Set an end time or a duration
Loop endlessly for continuous broadcasting
Run as many streams at once as you need
Check the source, encoder and connection before going live
Monitor and operate: Watch each stream while it runs, spot problems, recover automatically when needed, and manage everything remotely from the web or your phone
Track FPS, bitrate, speed and stream status.
Read a separate log for every livestream run.
Spot a failing source, encoder or output.
Detect frozen video and duplicate frames.
Retry automatically after a temporary connection error.
Start, stop, edit and restart from the website.
Two editions, Windows or Linux VPS, controlled from the website
Windows edition
Desktop App
Windows PC
DHB Stream Pro app
Platforms
YouTube · Facebook · TikTok · RTMP
Stream your computer screen, TikTok LIVE Studio and a virtual camera
Render streams from ready-made templates, processed right on your computer
Use the computer you already have, no VPS to rent
Your computer has to stay on with the app open for the whole stream
If the power or your home internet goes out, the stream stops too
Stream from files, links, your screen or a camera.
Broadcast a video, a folder or an existing playlist.
Use links from YouTube, Facebook, TikTok and many other video sites, or a direct link.
Import several videos and URLs from a text file.
Record the full screen, a window or a selected region.Windows only
Capture audio from the system, an app or a device.Windows only
Stream from TikTok LIVE Studio and a virtual camera.Windows only
Broadcast to YouTube, Facebook and RTMP/RTMPS.
Broadcast to TikTok.Windows only
Design & render
Build a template once and reuse it across streams.
Build a template visually with drag-and-drop.Windows only
Add video, images, text, scrolling text and music.Windows only
Insert intros, outros and several content layers.Windows only
Apply visual and audio effects.Windows only
Preview the result before it goes into the stream.Windows only
Write your own FFmpeg commands.Windows only
Use your templates for streams on a VPS (.dhbpack file).
Re-encode videos as you upload them to the VPS.Linux VPS only
Manage & run 24/7
Run many streams at once, with automatic retries.
Run several livestreams on the same machine.
Schedule the start, the end and looping.
Track FPS, bitrate, speed and status.
See the last 5 minutes and recent incidents for each stream.
Retry and recover automatically after an error.
Check the source, encoder and connection.Windows only
Streams 24/7 even with your home computer off.Linux VPS only
Remote control
No need to sit at the computer, your phone is enough.
On the website
See every machine and stream on one page.
Start, stop and edit streams in your browser.
Works on your phone.
Windows PCs and VPSes share one account.
On Telegram
Connect with a QR code.
Get alerts when a stream fails or a machine goes offline.
Start, stop and restart streams from Telegram.
Invite others to follow along.
Runs on many kinds of VPS
Rent a VPS anywhere, as long as it runs 64-bit Linux.
Supported systems
Ubuntu 22.04+
Debian 11+
AlmaLinux 8+
Rocky Linux 8+
RHEL 8+
Oracle Linux 8+
CentOS Stream 9+
Easy to set up, light to run
Install with one command.Linux VPS only
1 vCPU and 1 GB RAM are enough.Linux VPS only
Update the VPS software from the website.Linux VPS only
How to use
Hướng dẫn sử dụng cơ bản DHB Stream Pro v8
Install & get started5 steps · step 10/5
Loading the DHB Stream Pro interface…
Sign in to dhbtools.com with the account that bought DHB Stream Pro.
Step 1/5Download and install
Step 1/5
Download and install
Get the installer from your Account page, then click Run now.
Add a live stream (Windows version)
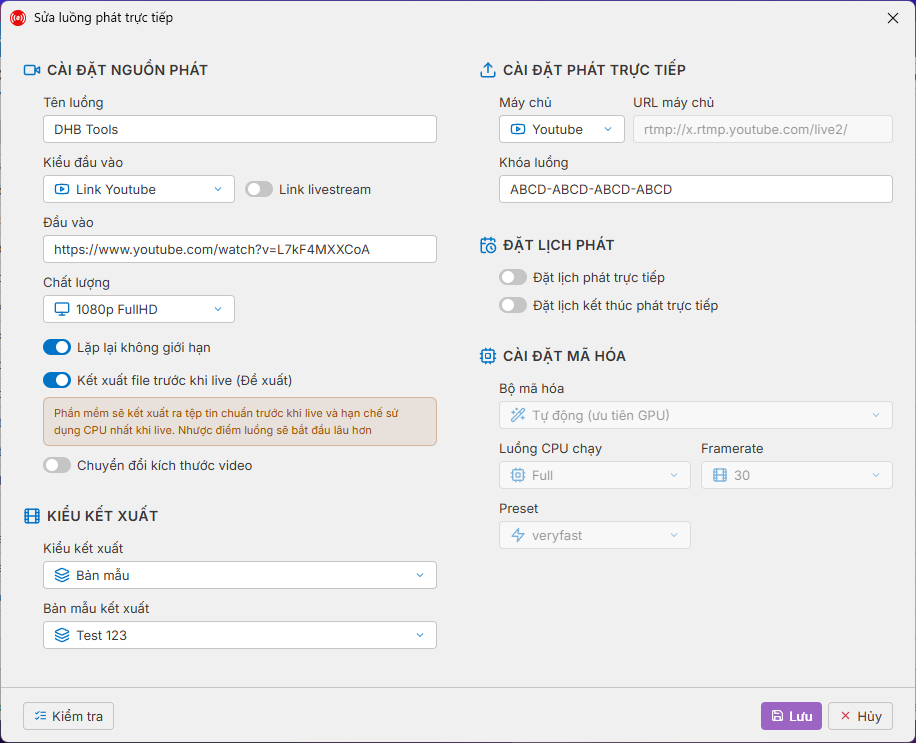
Stream source: Click Add Stream, then give the stream a name that's easy to recognize. The Input Type box has six choices. File is one video on your computer. Folder plays every video in a folder, one after another. Link Youtube and Link Youtube-dl take an online video from its link. Direct Link is the direct address of a video file. Text List is a text file that lists your videos. Turn on Loop Infinitive, and the video plays over and over until you stop the stream. Turn on Pre-render before live, and the software renders a video file ahead of time, before it streams. That way the computer barely uses the CPU while you are live. In return, the stream needs extra time to get ready before it goes on air.
Render type: The Render Type box has four choices. No filter streams the original video untouched, so it is the lightest on your computer. Encode video re-encodes the video before streaming, at three levels: optimal, high and low. Use Encode when the original video is too heavy, its bitrate is too high, or its format is unusual, so the stream stutters or the platform rejects it. Template applies a design with a logo, scrolling text and background music. Templates live in the Render Settings tab, where you can design your own. Code ffmpeg uses a command you write yourself.
YouTube stream key: In the Server box, choose Youtube. Open YouTube Studio, go to Go live, then click Copy next to the stream key. Back in the software, paste it into the Stream Key box, then click Add. Click the green arrow in the Run column. When the status changes to Streaming, the stream is on air.
TikTok LIVE Studio and virtual camera: To go live on TikTok through LIVE Studio, choose TikTok LIVE Studio in the Server box, then click Create link. Open TikTok LIVE Studio, add a Link source, then paste the link you just created. The stream shows up right away in the LIVE Studio frame. Virtual Camera is a virtual webcam. The software streams into a webcam called DHB Stream Pro Camera. Apps that use a webcam, like OBS, pick this camera and see the stream. Use the virtual camera when the app you want to stream to only takes a webcam, not a stream key. The virtual camera carries video only, with no sound.
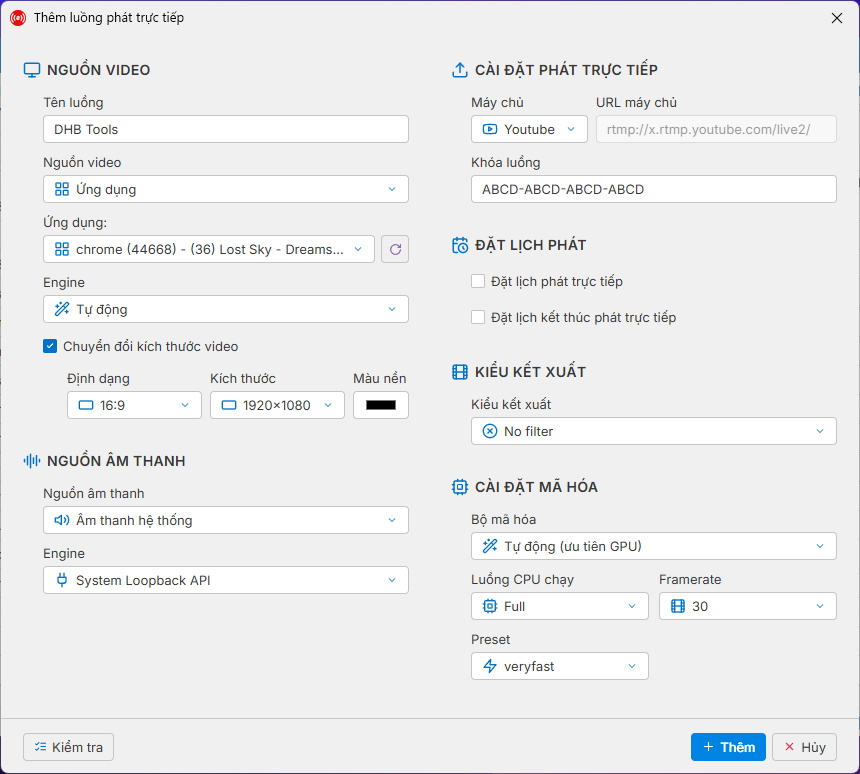
Stream your screen: Click Add Stream Record Screen to stream whatever is showing on your computer. The Video Source box has three types: the full screen, a region you drag to select, or one app window. The Audio Source box picks the system sound, one app's sound, or a microphone. Fill in the server and stream key the same way as a normal stream. Click Add, then Run, and you are on air.
Render templates (Windows version)
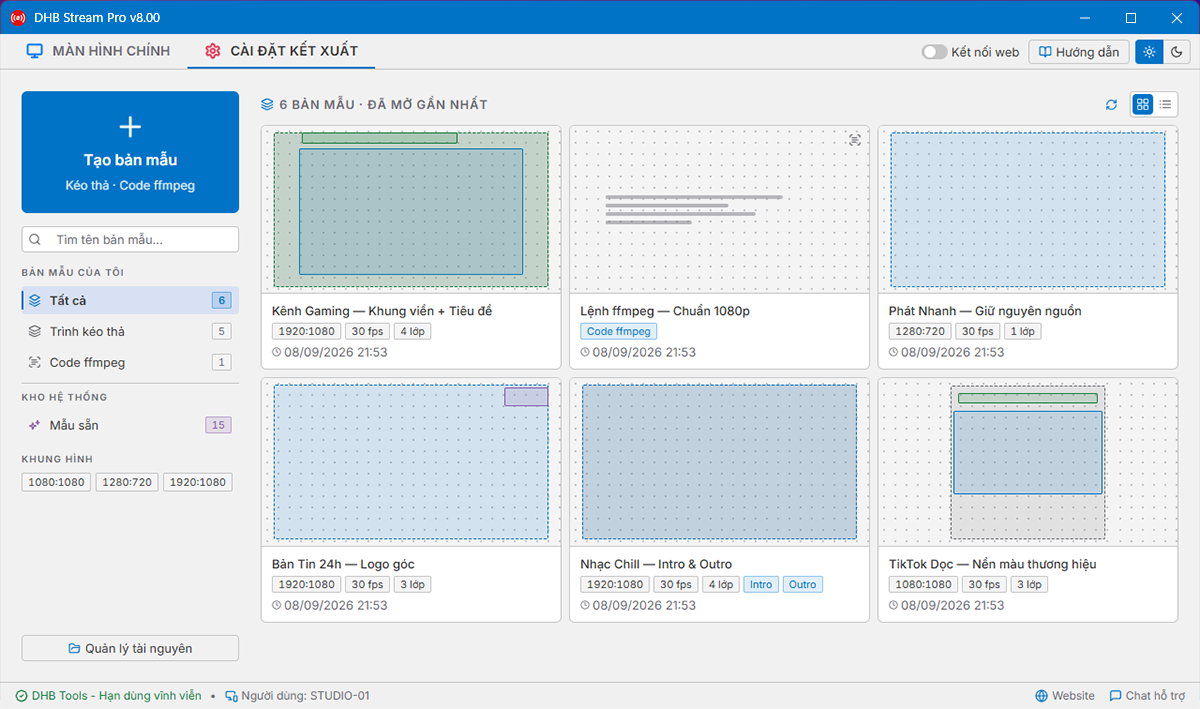
Templates and ready-made ones: A template is the frame of your stream: the background, logo, scrolling text, background music and effects. Design it once, and you can attach it to many different streams. Ready-made has 15 templates you can use right away, like a vertical 9:16 frame with a blurred background, a corner logo, or scrolling text at the bottom.
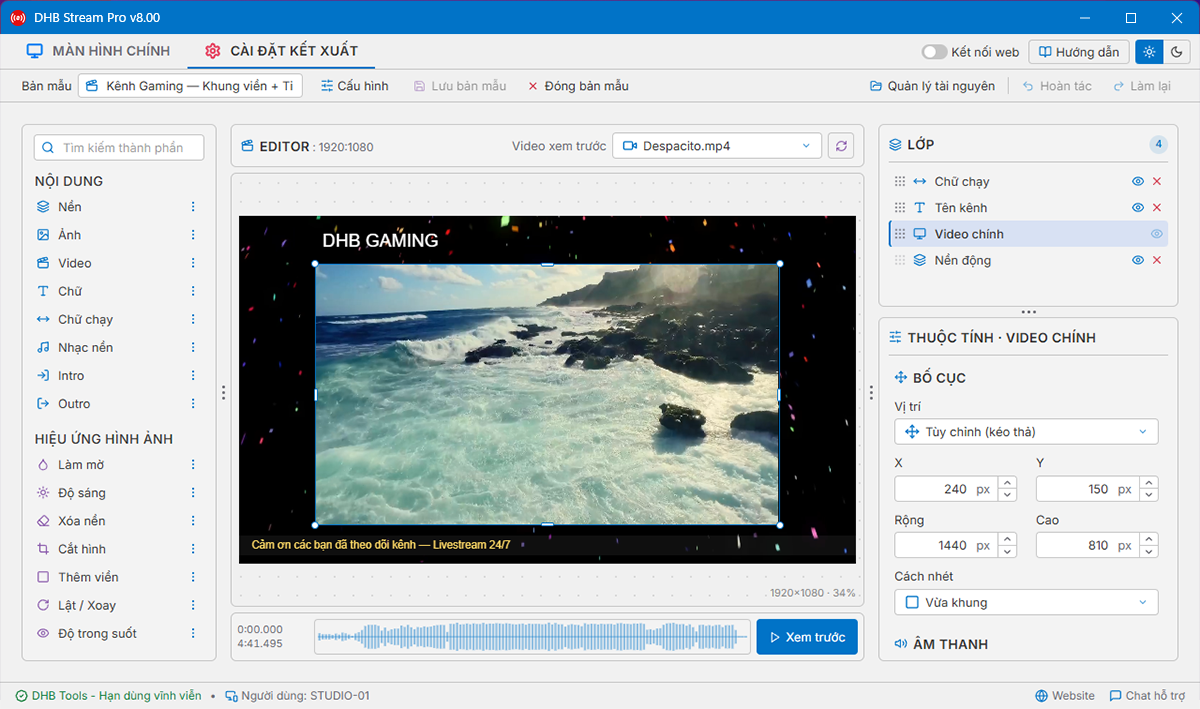
Create a new template: Click Create Template. Drag & Drop lets you design visually with layers and effects. Code ffmpeg is for anyone who wants to write their own command. In this example we pick Drag & Drop. Name the template, then in the Layout step choose the size mode and the aspect ratio. Click Create. The designer has three columns: the content and effects library on the left, the stage in the middle, and the Layers and Properties panels on the right.
Logo, scrolling text, music and effects: Drag Image onto a corner of the stage to make a logo. Drag Scrolling Text to the bottom of the frame, then type the text in the Properties panel. Drag Background Music in to play it with the video. Drag an effect onto the layer you want. For example, drag Blur onto the background, then drag the Intensity slider to adjust it.
Preview, save and resources: Click Preview and the software runs it exactly as it will stream, with picture and sound. When you're happy, click Save Template. The Resource Manager button opens your shared library of images, videos, audio, fonts, intros and outros. You can even drag whole folders from your computer into it.
Attach a template to a stream: Back on the Main Screen, click Edit on the stream you want. Set Render Type to Template, pick the template you just made, then click Save.
Monitor & operate (Windows version)
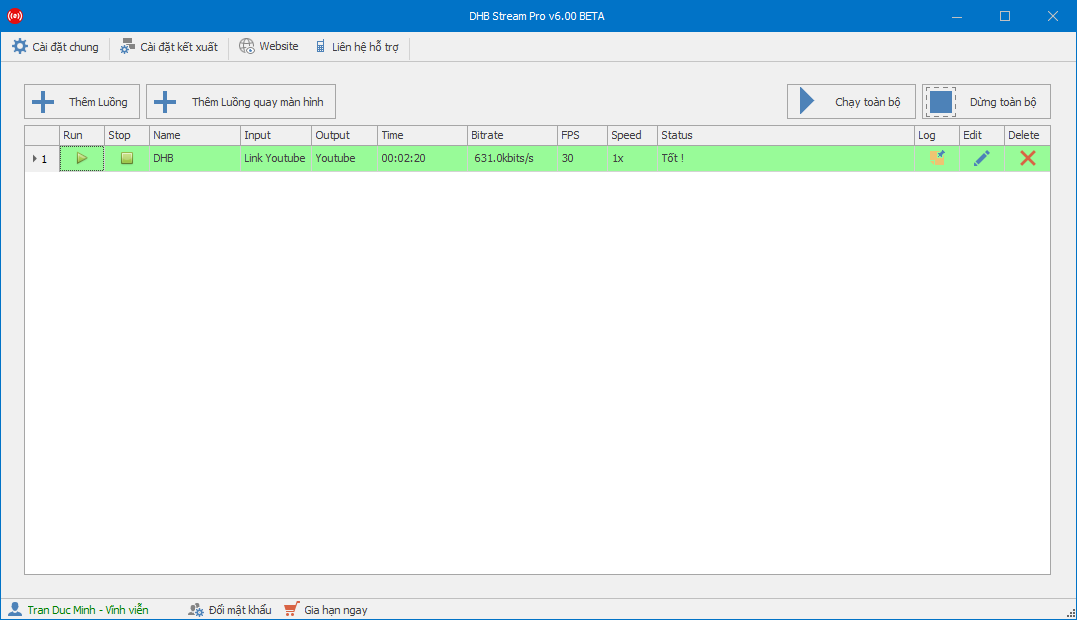
Run several streams: Click Run All to start every stream; the software opens them one by one so your computer isn't overloaded. To run just a few, hold Ctrl and click to select them, then right-click and choose Start Stream.
Stream details and incidents: Click the button in the Log column to open the stream's details window. The Overview tab shows output FPS, bitrate, speed and time on air, with a chart. The Recent incidents card tells you which step has a problem, for example a slow source, an output that can't keep up, or a frozen picture while the sound keeps playing.
Logs and error reports: The Log tab records each run; the first line is the cause and the lines after it are the effects. When you need help, click Report on that line, and you'll see the Admin's reply right in the chat window.
Check and edit while running: Before an important stream, right-click the stream and choose Pre-stream check. Anything that needs fixing has an Edit button that takes you straight to the right place. You can still edit a stream while it runs. After you save, the button in the Restart column turns orange. Click it to restart and apply the changes.
Automatic recovery: When the connection drops in and out, the software retries on its own and shows a countdown in the Status column. If the stream key is wrong or the channel isn't live yet, the software stops and tells you clearly so you can fix it.
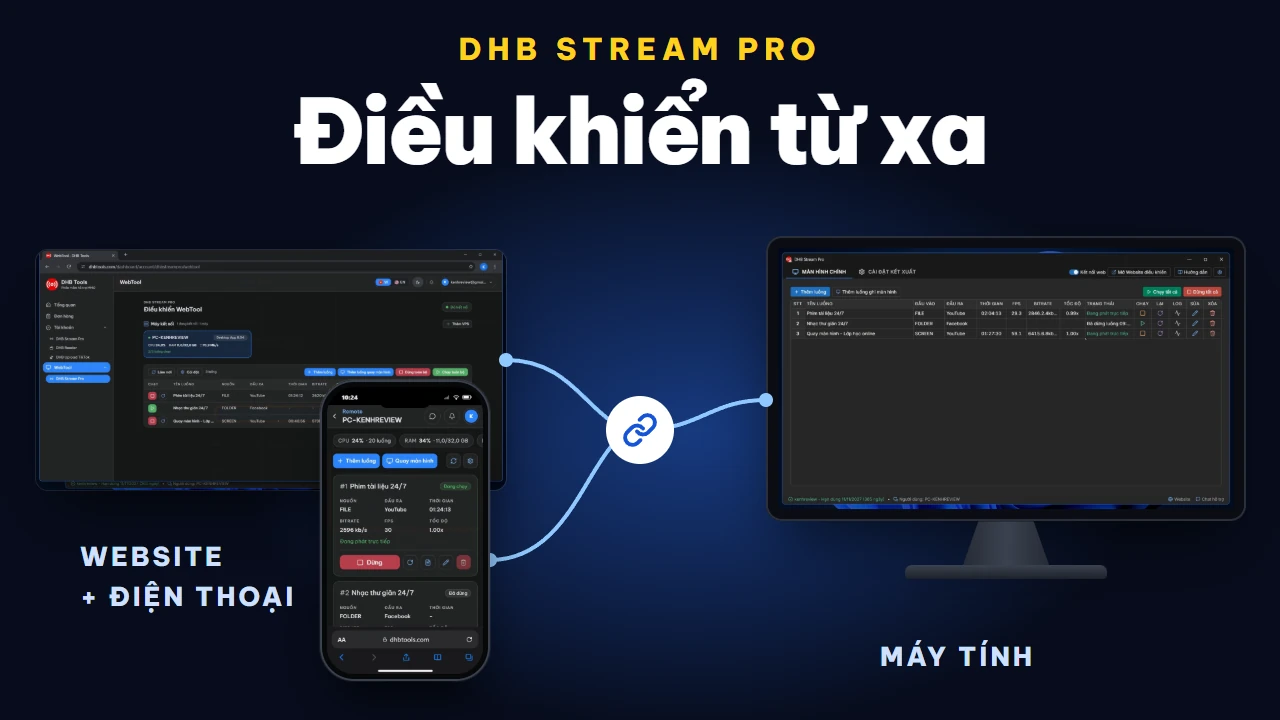
Control from the website: In the software, turn on Web Connection. Click Open Web Control. On your phone, sign in to dhbtools.com and open WebTool, DHB Stream Pro. This page shows the connected computers and the streams on each one. In the Run column, click the green button to start a stream and the red button to stop it. Click Add stream to create a new stream right on the website. Every change is sent straight to the software on your computer.
Control through Telegram: Click Settings, choose DHB Tools bot, then click Connect my Telegram. Scan the QR code with your phone. Telegram opens a chat with the bot. Tap Start and you're linked. From then on, whenever a stream fails, retries or goes live again, the bot messages you right away. Tap the Menu button next to the message box, then pick the menu command to see your machines and streams. Tap a stream to stop it, restart it or read its log right in the chat. A Windows machine must have Web Connection turned on for alerts to be sent.
Prepare the VPS (Linux version)
What a VPS is, when to use one: A VPS is a virtual server you rent by the month, always on and always online. Software running on a VPS streams day and night, even when your computer is off. In return, you pay rent every month. If you need more features, use the Windows version.
What the VPS needs, where to rent it: A VPS only needs Ubuntu 22.04 or another Linux version, 1 CPU core and 1 GB of RAM, and it can run 10 to 15 streams at once. Renting one costs about 5 to 7 dollars a month, from DigitalOcean, Vultr or any other provider. Once rented, all you need is the IP address, username and password.
Connect the control page (Linux version)
Open the control page: Sign in to dhbtools.com with the account that bought DHB Stream Pro. In the left column, open WebTool and choose DHB Stream Pro. If the account has no machine yet, the page asks where your software runs. Choose Linux machine.
Click Add VPS: The account has no VPS yet, so click Add VPS to connect the first machine. On Windows, install with the Installer app for speed. If you prefer a terminal, or you're on macOS, choose Install via SSH. The next part shows how to install with the Installer app.
One device slot per VPS: Each VPS uses one device slot of the account, just like a Windows computer. A free slot can be picked right away. If you pick a slot that another machine is using, that machine is signed out and its streams stop.
Install on the VPS (Linux version)
Download the Installer app: On the Installer app tab, click Download app. When the download finishes, click the file to open it. The first time you open it, if Windows shows a warning, click More info, then Run anyway.
Connect to the VPS: Enter the VPS IP address and password. If you use an SSH key, choose Key file. Click Connect. The app checks whether the VPS can run the software.
Click Install: Click Install and wait about a minute. The app reports each step until it's done.
Sign in to pair: Click Sign in, and the software opens your browser. If your browser isn't signed in yet, sign in to your DHB Tools account first. Your browser opens the Pair VPS box on dhbtools.com. Pick the account in the left column and a device slot in the right column, then click Approve pairing. After three seconds, the page opens the machine you just paired.
Another way: Install via SSH: If you're comfortable with the command line, choose the Install via SSH tab, then pick PowerShell, PuTTY or Bitvise to match the program you use. If you use a Mac or Linux, install this way, since the Installer app doesn't support those systems. On a Mac or Linux, only Terminal works. The page switches PowerShell to Terminal for you. Step 1, pick a free device slot. Step 2, enter the VPS IP. The page builds the sign-in command for you to copy. Step 3, click Create install command. The command is copied for you, and works only once, within 60 minutes.
Open PowerShell: Click the search box on the taskbar, then type PowerShell. Click Windows PowerShell to open it.
Paste the command on the VPS: Right-click to paste the sign-in command into PowerShell, then press Enter. If it asks yes or no, type yes. Next, type the VPS password. The password won't show on screen as you type, and that's normal. Just type it correctly and press Enter. If it's right, the VPS confirms you're signed in. Once you're signed in, right-click to paste the install command, then press Enter. Wait about a minute, until the line saying the machine is connected appears. The machine is now on the control page.
Installed but not paired yet?: If the machine doesn't show up after installing, the VPS prints an 8-digit code and a link. Enter that code in the Add VPS box, or open the link and click Approve pairing. The code expires after 15 minutes. The VPS then prints a new one.
Update the software on the VPS: When a new version is out, the Settings box shows an Update button next to the VPS. Click Update, check What's new, then click Confirm update. The VPS downloads and installs the new version on its own, no SSH needed. Your account, device slot and stream list are kept, and streams that are live are not cut off. A machine installed before version 0.9.1 needs one update with the Installer app, and the box shows you how.
Commands on the VPS: The VPS comes with a few commands for quick checks. The status command tells you whether the software is running. The pair command prints the pairing code again. The logout command disconnects right on the VPS. The allow command lets the software read videos from another folder on the VPS.
Uninstall: To uninstall, click Uninstall in the Installer app. Tick Delete all related data if you also want to remove the videos, logs and stream list.
Add a stream on the VPS (Linux version)
Create a stream on the VPS: Click the Linux machine card, then click Add stream. First, give the stream a name.
Source: In the Input type box, choose to stream from a file, a folder or a YouTube link. For a YouTube link, also choose how to get the video: VPS downloads, or via DHB server. Here we stream a video file from the computer: click Choose on this computer, or drag and drop the video into the box. If the video is already on the VPS, click Choose on the VPS.
YouTube links and How to get the video: With a YouTube link from your own channel, the box adds a section called How to get the video. VPS downloads is the default: the VPS fetches the video and plays it on a loop. If YouTube blocks the VPS, upload a cookie file, or choose Via DHB server. That option has a daily limit. For a livestream link, only VPS downloads works.
Render type: No filter streams the video as is, and is the lightest option. If the video isn't H.264, choose Encode video to re-encode it. Our video is already in that format, so we keep No filter.
Server and stream key: In the Server box, choose YouTube, Facebook or RTMP. Paste the stream key into the Stream key box. To stream through a different IP address, turn on Push the stream through a proxy.
Schedule, then add the stream: To set a start time, turn on Schedule the live stream. Click Add stream. The new stream appears in the table, showing Waiting to upload.
Upload the video to the VPS: Click the Upload button in the Run column. The video starts going straight from your browser to the VPS, with a spinner showing it is uploading. Keep the page open until the stream shows Ready.
Run & monitor (Linux version)
Start and stop streams: Click the green button in the Run column to start a stream, and the red button to stop it. Start all and Stop all apply to every stream on the VPS. Once a stream is live, you can close the page or turn off your computer. The VPS keeps streaming.
Stream status: The Status column shows what the stream is doing: Rendering, Uploading, Ready, then Live. When the network is unstable, the stream shows Disconnected, retrying, then the VPS streams again on its own.
Log and checking for errors: Click the Log button to see the stream's log. Lines in red are errors; click Report error to send them to DHB Tools. Switch to the Overview tab to check recent incidents and the number of retries.
Telegram notifications: Click Settings, choose DHB Tools bot, then click Connect my Telegram. From then on, the bot messages you right away when a stream fails or goes live again. You can even stop or restart a stream right in the chat.
Manage from your phone: You can also manage everything on the dhbtools.com website, right on your phone. Each machine shows its CPU, RAM, disk, network and live streams. Tap a machine to see each stream: run time, bitrate, FPS, speed and status. You can start, stop, restart, read the log, edit or delete a stream, or add a new one.
Disconnect: To release the device slot, click Disconnect on the machine card or in the Settings box. Live streams stop right away, and the stream list on the VPS is deleted. Videos you uploaded to the VPS are kept. The software stays on the VPS, waiting for you to pair it again.
7 bước có ảnh: kết nối máy với WebTool để chạy, dừng luồng DHB Stream Pro từ trình duyệt, rồi kết nối Telegram để nhận cảnh báo và bấm nút điều khiển trong chat.
Hướng dẫn từng bước có ảnh: chuẩn bị VPS, thêm VPS trên WebTool, cài và ghép nối, tạo luồng, bắt đầu livestream 24/7 với DHB Stream Pro phiên bản Linux.
In this article, I’ll show you how to livestream on Youtube. For other platforms that use a stream key, you can follow the same steps.
Step 1: Add a stream to start Live- Create a Live stream and get the stream key
As you may know, we can no longer livestream multiple streams on YouTube using the old method, so in this guide I’ll show you how to create multiple YouTube live streams. Please note that this article is for users
DHB Stream Pro v8.04: LIVE Studio link and virtual camera
Version 8.04 adds two ways to send a stream into other software on your own computer: a link for TikTok LIVE Studio and the DHB Stream Pro Camera virtual camera, usable in OBS or on web pages. The virtual camera needs administrator permission once during installation.
It also fixes connection problems on IPv6-only machines and issues that made the new outputs freeze or the app close itself when the network was unstable.
NewNew Link output: create a local link to paste into the Link source of TikTok LIVE Studio.
NewNew virtual camera, DHB Stream Pro Camera, for use in OBS and on the web, with four cameras available.
FixFixed failing to connect on machines that only have IPv6.
8.0327/10/2026
8.0327/10/2026
DHB Stream Pro v8.03: steadier connection
Version 8.03 is a connection fix. When one of the system servers has trouble, the app switches to a backup route so you are not logged out or have streams stopped unexpectedly.
FixKeeps your session steadier when a server has trouble by switching to a backup route.
8.0221/10/2026
8.0221/10/2026
DHB Stream Pro v8.02: steadier scheduling and playback
Version 8.02 fixes three customer-reported problems: scheduled streams going live early, videos replaying even when Loop is off, and lives ending by themselves after about 20 to 30 minutes.
The computer is also kept awake while streams are running, and status messages now explain more clearly what happened to a stream.
FixFixed scheduled streams going live immediately on later Run clicks.
FixFixed videos restarting from the beginning even when Loop is not selected.
FixStreams without Loop reconnect after a brief connection loss and continue from the same position.
8.0112/10/2026
8.0112/10/2026
DHB Stream Pro v8.01: better on VPS and video folders
Version 8.01 focuses on running livestreams reliably on a VPS and with large video folders.
The software now runs on older Windows VPS machines, lets you pick the ffmpeg set per machine, pre-renders folders faster and reconnects more cleanly after a network drop. The video picker for folders also has easier filters.
FixWorks on older Windows VPS such as Server 2012 R2 thanks to a compatible ffmpeg set.
NewA new Settings box to choose and update the ffmpeg set that suits each machine.
FixDisplays correctly on a VPS used through Remote Desktop: no more jerky spinners, and warning boxes are readable.
FAQ
Frequently asked questions
Can't find your question?Ask our support team in chat.
DHB Stream Pro is software for running and managing several livestreams on Windows. You can take a source from a video, a folder, a link or your computer screen, then broadcast it to a number of different channels from the same app.
You can broadcast a single video, a whole folder, a YouTube link, a direct link, or a list of several videos and URLs. The software can also record your full screen, a window that is already open, or a region of the screen that you choose.
The software comes with presets for YouTube and Facebook, and it also supports other RTMP/RTMPS servers. As long as the platform gives you a server URL and a stream key, you can set it up and broadcast to it.
The Windows version needs a recent 64-bit Windows, at least 4 GB of RAM (8 GB or more is better when you run many streams), about 1 GB of free disk space and a stable internet connection. A graphics card is not required, but an NVIDIA card lets you use hardware encoding as well.
Yes. You can install DHB Stream Pro on a Windows VPS, or use the Linux (Ubuntu) version installed on a VPS and controlled entirely from the website, without keeping your own computer on. The Linux version streams ready-made videos and YouTube links.
Yes. The software supports up to 50 streams running in parallel at a technical level. How many you can actually run also depends on your machine, GPU, RAM, and above all on your network upload speed.
The plans differ only in how long you can use them, and the features are the same. Please see the pricing table on this page.
Sign in to dhbtools.com, open the Account page, choose DHB Stream Pro and click Download, then open the installer and click Install. When you sign in, enter your DHB Stream Pro username (not your email); if the account is tied to another computer, you will receive a 6-digit verification code by email.
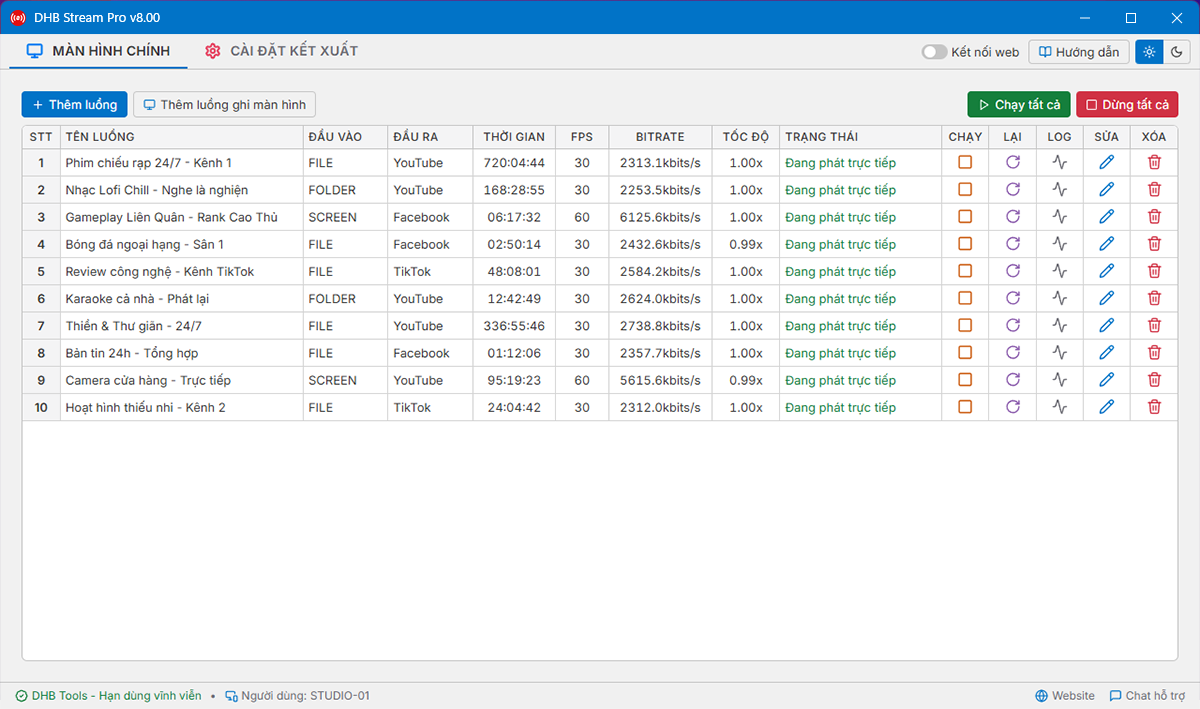
Click Thêm luồng (Add stream), enter a stream name, set the input type to File and pick your video. Then choose the YouTube server, paste the stream key from YouTube Studio, click Kiểm tra (Check), then click Thêm and the run button in the Chạy column.
Yes. With the Windows version, turn on the Kết nối web (web connection) switch and click Mở Website điều khiển to start, stop, restart and edit streams and read the logs from your phone or another computer, but the software on the streaming machine must still be running. With the Linux version on a VPS, a stream that is already Đang phát keeps running when you close the page or turn off your computer.
Yes. Each stream can have a start time and an end time (at a specific moment or after a set duration), and you can turn on looping. On the Windows version you still click Chạy so the stream goes into the waiting queue, and the software must be open until the start time; on the Linux VPS version a scheduled stream starts on time by itself.
Yes, you can. Choose the Facebook server and paste the stream key; Facebook only accepts AAC audio, so for a video with MP3 audio choose Encode video.
Yes, on the Windows version through TikTok LIVE Studio: click Tạo link and paste the link into LIVE Studio as a Link source (vertical 1080 x 1920 frame). The Linux version on a VPS does not support TikTok LIVE Studio yet.
Yes. When you capture a screen, a window or a region, you can pick system audio, the audio of a single application, a playback device, a microphone, or no sound. Screen capture is only available on the Windows version.
Yes. Each stream has its own destination, so you create several streams running in parallel, each with its own stream key. Once one stream is set up, right-click it, choose Sao chép luồng (Copy stream), then change the source and the stream key on the copy.
Not always. For a suitable video, Stream Pro can use copy mode to broadcast without re-encoding, which takes load off your CPU. If you add effects, change the frame size or edit the content, the video will need to be processed again.
No, it is not required. Stream Pro has a built-in drag-and-drop editor so you can add video, images, text, music, intros, outros and effects directly in the app. If you are comfortable with FFmpeg, you can also write your own commands.
No filter streams the video as it is, so it is the lightest on your computer; Encode video re-encodes before streaming; Template streams with a design you build (logo, scrolling text, background music, effects); ffmpeg code is for people who know ffmpeg commands. No filter suits H.264 video with AAC audio, while for H.265, VP9, AV1 or when you are not sure, choose Encode video.
Open the Cài đặt kết xuất (render settings) tab, click Tạo bản mẫu (Create template), choose the Kéo thả (drag and drop) tab, add a logo, scrolling text, background music and effects, then click Xem trước (Preview) to check. After saving, open the stream, set the render type to Bản mẫu (Template) and pick the template you made; you can also use the 15 ready-made templates under Mẫu sẵn.
When it is on, the software renders the video to a file first, so it uses less CPU during the live, but the stream takes longer to start. Weak computers or setups with many streams should turn it on; if the Tốc độ (speed) column drops below 1.00x, turning it on is a way to reduce the load.
Yes. A graphics card is not required, because the software uses the CPU (x264) when there is no card. If you have an NVIDIA card, set the encoder to Tự động (Auto) or Hardware Nvidia to use the GPU and take load off the CPU.
You need a 64-bit (x86_64) Linux VPS, with Ubuntu 22.04 or later recommended; Debian 11+, Rocky and AlmaLinux 8+ are also supported. A starting spec is 1 vCPU and 1 GB of RAM, with no graphics card needed; what deserves more attention is the upload bandwidth and traffic quota of the VPS plan.
Go to WebTool, open DHB Stream Pro, choose Máy Linux (Linux machine) and click Thêm VPS (Add VPS). You can install with the Windows app (enter the IP, user, password or key file, then click Kết nối, Cài đặt, Đăng nhập) or choose the Cài qua SSH tab and paste the install command that the website generates.
The Linux version runs 24/7 and is controlled entirely from the website, but it does not yet have screen capture, TikTok LIVE Studio, a virtual camera or custom FFmpeg commands. Videos must be uploaded to the VPS before streaming (for YouTube links the VPS downloads them itself), and No filter only works with H.264 video and AAC or MP3 audio.
There is no fixed number, because the VPS only passes the stream through, so upload bandwidth is what decides: one 4.5 Mbps stream running all month uses about 1.46 TB of traffic. Start with a few streams, watch the Tốc độ (speed) column stay around 1.00x, then add more gradually.
You click Tải lên (Upload) in the Chạy column so the video goes straight from your browser to the VPS, and you must keep the page open until the status is Sẵn sàng phát (Ready to stream). Once the stream is Đang phát (Streaming), you can close the page or turn off your computer.
Stream Pro has a pre-flight check that helps catch some problems with the source, the encoder or the connection before you go live. While a stream is running, if it hits a temporary connection error the software will retry and recover the stream instead of stopping straight away.
The Kiểm tra (Check) button tests your video file, audio, processing ability and the connection to the destination without saving the stream, and reports one of three levels: Sẵn sàng (Ready), Cần lưu ý (Needs attention), Cần xử lý (Needs fixing). You press it yourself when you want a check; it does not run automatically and does not block the Chạy button.
It means the Tốc độ (speed) column has dropped below 0.9x, so your computer or network cannot keep up with real time. Try fewer streams or effects, turn on Kết xuất file trước khi live, use No filter if the video suits it, and check your network upload speed.
It is usually a wrong stream key. The software stops that stream completely instead of retrying, so copy the latest key from YouTube or Facebook, paste it again into the Khóa luồng (Stream key) field and run the stream again.
On the Windows version, the Link Youtube and Link Youtube-dl sources read their data through the Firefox browser, so the computer needs Firefox installed, opened at least once and signed in to a YouTube account. Without Firefox these link sources may not work.
On the Windows version, closing DHB Stream Pro, putting the computer to sleep or closing a laptop lid stops every stream, so keep the computer on with a network connection for the whole broadcast. To stream continuously without leaving your computer on, use a Windows VPS or the Linux version on a VPS.